It’s true! You can give your cabinets a fresh new look simply by painting them. But before you grab that paintbrush, there are a few things you need to know. In this article, we will explore the process of painting Shaker cabinets, from choosing the right materials to step-by-step instructions on how to achieve professional results. So, if you’re ready to give your kitchen a makeover that will leave everyone in awe, keep reading to learn how you can paint your Shaker kitchen and create a stunning space that reflects your style and personality.
Choosing the Right Material for Painting
When it comes to painting your Shaker kitchen cabinets, it is crucial to choose the right material that is compatible with the painting process. Assess the current finish of your cabinets before painting. All types of wood are suitable for painting, including unfinished, stained, or already painted wood. However, it is important to avoid painting laminate cabinets as the paint doesn’t adhere well to the surface. Ensure the material of your cabinets is compatible with the painting process by considering its durability and longevity.
Before painting, it is essential to properly prepare your cabinets. Empty them completely and thoroughly clean them, removing dust and kitchen grease. Remove any knobs and handles that you don’t want to paint, and cover the hinges with painters tape to protect them. Repair any imperfections or holes using a wood filler and sandpaper the surfaces. This step will ensure a smooth and even finish.
When choosing the right paint color, consider your kitchen design and personal style. Invest in high-quality paint for a long-lasting and durable finish. Semigloss or gloss finishes are recommended for kitchen cabinets due to their durability. Matte finishes should be avoided as they lack durability. Apply at least two coats of paint to achieve the desired color and coverage.
Preparing the Cabinets for Painting
To ensure a smooth and successful painting process for your Shaker kitchen cabinets, it’s essential to properly prepare them before picking up that paintbrush. This step is crucial in achieving a professional and long-lasting finish. There are several key aspects to consider when preparing your cabinets for painting, including sanding techniques, cleaning methods, taping strategies, paint color options, and drying time considerations.
First, let’s talk about sanding techniques. Before painting, it’s important to sand the surfaces of the cabinets to create a smooth and even base. Use sandpaper or a sanding block to gently remove any imperfections or rough spots. This will help the paint adhere better and ensure a flawless finish.
Next, cleaning methods are crucial for removing dust, grease, and other debris from the cabinets. Use a mild detergent or a degreaser to thoroughly clean the surfaces. This will ensure that the paint adheres properly and prevents any dirt from affecting the final result.
Taping strategies are also important to protect certain areas of the cabinets that you don’t want to paint. Use painters tape to cover hinges, knobs, and handles to ensure they remain unpainted and functional.
When it comes to paint color options, choose a color that complements your kitchen design and personal style. Consider using high-quality, self-leveling paint for a durable and long-lasting finish. Experiment with different shades to find the perfect color that will transform your Shaker cabinets.
Lastly, drying time considerations are important to ensure that the paint fully sets and cures before reassembling the cabinets. Follow the manufacturer’s instructions on the paint can for the recommended drying time. This will prevent any smudging or damage to the freshly painted surfaces.
Organizing the Painting Process
To ensure a smooth and efficient painting process for your Shaker kitchen cabinets, it’s crucial to establish an organized workflow that will save you time and prevent any confusion during reassembly. Here are some key steps to consider when organizing the painting process:
- Time management: Efficiently organizing the painting process will help you stay on track and complete the project within the desired timeframe. Plan your painting process in advance, allowing for drying time between coats and any necessary touch-ups.
- Labeling and documenting: Keeping track of cabinet parts during the painting process is essential for a seamless reassembly. Label each piece or use masking tape to mark the location of each cabinet part. Take photos or make notes to remember the original configuration, ensuring that everything goes back together correctly.
- Proper storage: Safely storing screws and hardware during the painting process will prevent loss and make reinstallation easier. Keep screws and hardware together in a safe place, such as small containers or labeled bags, to ensure they don’t get misplaced or mixed up.
- Maintaining cleanliness: Steps to ensure a clean and dust-free painting environment will result in a professional finish. Clean the cabinets thoroughly before painting, removing any dust or kitchen grease. Cover the surrounding area with drop cloths or plastic sheets to protect against paint splatters and make cleaning up easier.
- Minimizing mistakes: Common errors to avoid when organizing the painting process include properly cleaning and sanding surfaces, using primer for better adhesion and durability, allowing each coat to dry before applying the next, and choosing the right type of paint for cabinets. By avoiding these mistakes, you’ll achieve a high-quality finish and minimize the need for touch-ups or fixes down the line.
Using a Primer for Better Results
Now that you have organized the painting process for your Shaker kitchen cabinets, it’s time to take the next step and enhance the results by using a primer. Applying a coat of primer before painting can make a significant difference in the overall finish of your cabinets. It helps the paint adhere better and creates a smoother surface for a more professional look.
When it comes to choosing a primer, you have two main options: oil-based or water-soluble. Oil-based primers are known for their durability and ability to adhere to various surfaces. They are an excellent choice for cabinets that will endure heavy use. On the other hand, water-soluble primers are easier to clean up and have less odor, making them a more convenient option for indoor projects.
To further enhance the results, consider tinting the primer to match your final color. This is especially important if you are lightening the cabinets. Tinting the primer helps ensure that the final color looks consistent and vibrant.
After applying the primer, don’t forget to sand the cabinets again. This step is crucial for creating a smooth surface and ensuring proper adhesion of the paint. Use a fine-grit sandpaper to gently sand the cabinets, removing any imperfections or roughness.
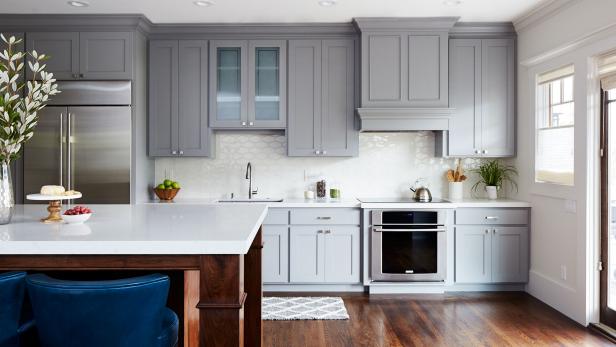
Choosing the Right Paint for Shaker Cabinets
When selecting the perfect paint for your Shaker cabinets, it is essential to consider factors such as durability, finish, and color to achieve a long-lasting and stylish transformation. Here are some tips to help you make the right choice:
- Paint color options for shaker cabinets: Consider colors that complement your kitchen design and personal style. Popular choices include white, gray, navy blue, and muted neutrals.
- Pros and cons of different paint finishes for shaker cabinets: Semigloss and gloss finishes are recommended for kitchen cabinets due to their durability and ease of cleaning. Matte finishes are not recommended as they lack durability and may show fingerprints and stains.
- Tips for achieving a professional looking paint job on shaker cabinets: Properly clean and sand the surfaces before painting. Use a primer for better adhesion and durability. Apply multiple coats of paint for a robust and even color. Allow each coat to dry before applying the next.
- How to properly clean and maintain painted shaker cabinets: Use a mild soap and water solution to clean the cabinets. Avoid abrasive cleaners that can damage the paint. Regularly dust and wipe down the cabinets to maintain their appearance.
- Alternative ways to update the look of shaker cabinets without painting: Consider adding new hardware, such as knobs or handles, to give your cabinets a fresh look. You can also update the cabinet doors by replacing them with glass or adding decorative panels.
Step-by-Step Guide to Painting Shaker Cabinets
When it comes to transforming your Shaker cabinets with a fresh coat of paint, following a step-by-step guide will ensure a smooth and successful painting process. To start, choose the best paint colors for Shaker cabinets that complement your kitchen design and personal style. Consider high-quality, self-leveling paint in a durable finish like semigloss or gloss for kitchen cabinets. Before painting, it’s important to prepare the cabinets properly. Remove all doors and hardware, clean and sand the surfaces to create a smooth base. Use painters tape to protect any areas you don’t want to paint. Apply a coat of primer to improve adhesion and durability, and then follow with at least two coats of your chosen paint color. Use a brush and foam roller for different areas, starting with the inner panels and then moving to the outer frames. Allow each coat to dry thoroughly before applying the next. Finally, reassemble your cabinets by reinstalling the doors and hardware. Avoid common mistakes such as not properly cleaning and sanding surfaces, skipping primer, rushing the drying process, and using the wrong type of paint. By following these steps, you can achieve a smooth finish and update the look of your Shaker cabinets without replacing them.
Reinstalling Cabinet Doors and Hardware for a Seamless Finish
To achieve a seamless finish and complete the transformation of your Shaker cabinets, it’s time to reinstall the cabinet doors and hardware. Here are some important steps to follow to ensure a successful and professional result:
- Gentle Handling: When handling the cabinet doors and hardware, be gentle to avoid chipping the newly painted surface. Treat them with care and use soft cloths or gloves to protect them during the reinstallation process.
- Avoiding Chipping: Take extra precautions to avoid chipping the paint when attaching the doors and hardware. Use a screwdriver or drill with a gentle touch and apply even pressure to prevent any damage to the painted surface.
- Proper Door Closure: Check the alignment of the doors and make any necessary adjustments to ensure proper closure. This will not only improve the functionality of your cabinets but also contribute to the overall seamless finish of the project.
- Maintaining Painted Cabinets: After reinstalling the doors and hardware, it’s important to maintain the newly painted cabinets. Avoid using harsh chemicals or abrasive cleaners that can damage the paint. Instead, use mild soap and water for regular cleaning and wipe away any spills or stains immediately.


