In this article, we’ll show you how to transform your laminate cabinets into stunning focal points in your space. From cleaning and preparing the surface to applying primer and paint, we’ve got you covered. So grab your tools and let’s get started on giving your cabinets a much-needed makeover!
Step 1: Cleaning and Preparing the Cabinets
Start by cleaning your cabinets with an all-purpose cleaner and a microfiber cloth to ensure they are free from dirt and grime. Deep cleaning is essential for proper surface preparation before painting laminate cabinets. When choosing a cleaner, opt for one that is effective in removing grease and grime, such as trisodium phosphate (TSP). Apply the cleaner to the cabinets, making sure to remove any stubborn grease stains. Afterward, thoroughly dry the cabinets to prevent any moisture-related issues during the painting process. Taking these steps will ensure that your cabinets are clean and ready for the next steps in transforming them into a fresh new look.
Step 2: Removing Doors, Drawers, and Hardware
Removing the doors, drawers, and hardware is essential in order to have better access and achieve a smoother painting process. Here are four steps to help you with this process:
- Remove the cabinet hardware: Use a drill or screwdriver to take off all the knobs, handles, and hinges from the cabinets. It’s important to keep them organized, so store them in labeled plastic bags.
- Organize the hardware: Use a marker and painter’s tape to note where each piece of hardware came from. This will make reassembling the cabinets much easier later on.
- Protect countertops: Place a drop cloth or protective covering over your countertops to prevent any paint spills or damage.
- Prepare your workspace: Set up an area where you can safely remove and store the cabinet doors and drawers. Having a designated space will keep everything organized and make it easier for you to work efficiently.
Step 3: Repairing and Preparing the Surface
After inspecting for dings and dents, fill in any scrapes or holes with wood filler to ensure a smooth surface for painting. Apply the wood filler by smearing it into the crevices with your finger or using a putty knife for larger holes. Allow the wood filler to dry completely before proceeding to sanding. When sanding, use fine-grit sandpaper and lightly sand the surface of the cabinets. This will help smooth out any rough areas and create a more even finish. Make sure to follow proper sanding techniques, such as applying even pressure and moving in long, smooth strokes. Sanding tips include wearing protective gear like gloves, protective glasses, and a dust mask or respirator. By filling holes and following these sanding tips, you will achieve a beautifully smoothed surface ready for painting.
Step 4: Applying Primer to the Cabinets
To begin applying primer to your cabinets, make sure you have a bonding primer on hand for better paint adhesion. This is an important step in the process of making your laminate cabinets look new. Here are some tips to help you achieve a smooth primer application:
- Avoid common primer mistakes such as applying too thick of a coat or not allowing enough drying time between coats.
- Proper ventilation is crucial when working with primers and paints to ensure that fumes are safely dispersed.
- Consider alternative priming options such as shellac-based primers or oil-based primers depending on the type of laminate cabinet you have.
- Use a high-quality brush or roller brush to apply the primer evenly and smoothly.
After applying the primer, it’s essential to follow best practices for drying time. Allow sufficient time for the primer to dry completely before moving on to the next steps in your cabinet makeover project.
Step 5: Sanding the Primed Surface
Once the primer has dried completely, it’s time to sand the surface for better paint adhesion. Sanding laminate cabinets requires specific techniques and careful attention to dos and don’ts. To begin, use fine-grit sandpaper or an orbital sander with a low grit paper to rough up the primed surface. This will create a textured finish that helps the paint adhere properly. When sanding laminate, be cautious not to over-sand and damage the laminate finish. It’s important to sand lightly and evenly across all surfaces. After sanding, clean off any dust with a tack cloth before proceeding with painting. Following these tips for sanding laminate cabinets ensures a smooth surface and optimal paint adhesion for your cabinet makeover project.
Step 6: Choosing the Right Paint for Laminate Cabinets
When selecting paint for laminate cabinets, it’s essential to consider the type of finish you want. Here are four important factors to keep in mind:
- Choosing paint colors: Select colors that complement your kitchen or desired aesthetic. Consider light shades for a spacious and airy feel or bold hues for a statement look.
- Best paint brands: Look for reputable brands known for their durability and adhesion on laminate surfaces. Research customer reviews and recommendations to find the best options.
- Painting techniques: Use smooth brush strokes or a roller brush for an even application. Take your time and apply multiple thin coats for optimal coverage.
- Matte vs. glossy finish: Decide whether you prefer a matte or glossy look. Matte finishes offer a subtle, non-reflective appearance, while glossy finishes provide shine and reflectivity.
Don’t forget to also consider painting the cabinet interiors to complete the transformation of your laminate cabinets!
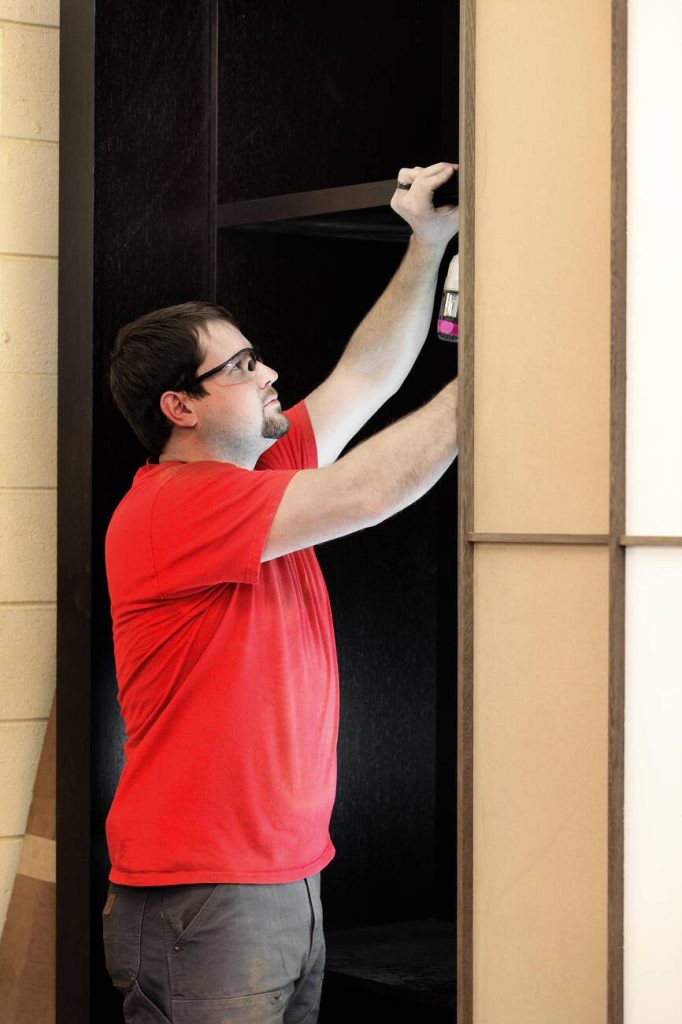
Step 7: Applying Paint to the Cabinets
Applying the paint to the cabinets requires smooth brush strokes or a roller brush for an even application. When it comes to applying techniques, you have two options: using a brush or a roller. A brush allows for more control and precision, especially around corners and edges. On the other hand, a roller brush can cover larger areas quickly and provide a smoother finish. As for troubleshooting issues, make sure to remove any air bubbles or streaks by lightly rolling over them with the roller brush or smoothing them out with the brush. When choosing color options, consider your overall kitchen aesthetic and personal preference. Lastly, be patient during drying time to ensure that the paint fully sets before reattaching doors and hardware.
Step 8: Applying Multiple Coats for a Smooth Finish
To achieve a smooth finish, it’s important to apply multiple thin coats of paint to the cabinets. Here are some tips to help you achieve a professional-looking finish:
- Importance of proper ventilation during painting process: Ensure that the area is well-ventilated by opening windows or using fans to prevent inhaling fumes and promote faster drying.
- Tips for achieving a professional looking finish: Use a high-quality brush or roller for even application, work in small sections, and keep your strokes smooth and consistent.
- Common mistakes to avoid when painting laminate cabinets: Avoid using too much pressure while sanding, skipping the priming step, not allowing enough drying time between coats, and rushing the process.
- Exploring alternative options for updating laminate cabinets: Consider adding new hardware or trim pieces to give your cabinets a fresh look without painting them.
Remember to weigh the pros and cons of painting versus replacing laminate cabinets before making a decision.
Step 9: Reinstalling Doors, Drawers, and Hardware
Now that you have achieved a smooth finish on your laminate cabinets, it’s time to move on to the next step: reinstalling doors, drawers, and hardware. This is where you can make some exciting choices to give your cabinets a fresh look. You may choose to reuse your existing hardware or opt for new ones for a more updated style. Additionally, consider adding decorative elements such as trim or molding to enhance the overall appearance of the cabinets. Updating hinges can also make a significant impact on the functionality and aesthetics of your cabinets. Lastly, take this opportunity to organize the interior of your cabinets by using dividers or storage solutions that suit your needs. By paying attention to these details, you can truly transform your laminate cabinets and make them look brand new again.
Step 10: Final Touches and Maintenance Tips
To add the final touches and ensure long-lasting results, don’t forget to wipe down your cabinets with a damp cloth to remove any dust or debris. Here are some tips for maintaining the new look of your laminate cabinets:
- Choosing the right cleaning products: Use non-abrasive cleaners specifically designed for laminate surfaces to prevent scratches and damage.
- Cleaning tools and equipment: Use a soft microfiber cloth or sponge to gently clean the cabinets. Avoid using abrasive scrub brushes or harsh chemicals that can strip away the protective sealant.
- Applying protective sealant: Consider applying a protective sealant to your cabinets every few years to enhance their durability and resistance against moisture, stains, and fading.
- Preventing scratches and damage: Use coasters or felt pads on the bottom of objects placed on top of your cabinets to prevent scratching. Avoid dragging heavy objects across the surface.


