If you have studied how to make shaker style doors, then you will grasp how to make framed beadboard cabinet doors rather quickly. You cut and build the two different styles using the same methods. The only difference is that the shaker design has a flat plywood panel rather than a pieced together beadboard center panel.
In this video Tony shows us exactly how to make new doors. He is using his very own nineteen seventy seven vintage kitchen as his remodeling project for the demonstration.
The stock lumber selected for this project is oak beadboard (wainscoting) that is one quarters of an inch (1/4″) thick. The slats of wood are pre-cut to thirty two inches (32″) long and designed to fit together with a tongue and groove application. When these individual slats are glued together they form a strong joint. The frames of the doors will be grooved with a dado blade, exactly in the center of the stiles and rails.
All you are going to need is a chop saw, a table saw, a few clamps, some glue and a rubber mallet.
Gluing The Beadboard Slats Together
- Apply glue directly in the center of the groove over the entire length of the board.
- Spread the glue evenly using a small brush.
- Inset the tongue into the groove and make sure that they are seated fully.
- Use a mallet and a scrap board to help force them together.
- You can use a Wet One to remove all excess glue.

Important: Before turning on any tools, be sure that you are taking the proper safety precautions. You are going to need safety glasses, ear plugs and a dust mask. Above all, keep your fingers out of the saw!
Preparing The Frame
The wood used in this video is poplar. This is standard stock, two and a half inch (2-1/2″) wide by three quarter inch (3/4″) thick stock.
The stiles, which are the side pieces should be cross-cut a little long because they will be trimmed off after the door is assembled. The rails themselves need to be cut to the exact length. You are going to use a chop saw to make the cuts.
Cutting the grooves in the frame pieces will be done with a dado set. You will need to get the table saw aligned perfectly by using a scrap piece of wood. Follow the demonstration in the video for setting up the feather boards. You will be making two passes through the blade in order to ensure that the groove is centered perfect to accept the bead board center panel.
Next, you will need to set up the dado blade to cut the tongue on the ends of the rail pieces of the kitchen cabinet shaker style, beadboard doors. When setting up the table saw for this process, you should install a sacrificial board on the fence. This will allow you to make your cuts exactly on the ends of the cabinet door rails.

Forming The Center Panels
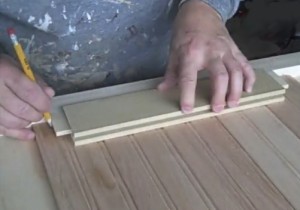
In the video, the instructor has made a template for cutting off the ends of the beadboard panels perfectly square. Cut both ends off of each panel to the exact length that they need to be.
Next, place the stile that is to be matched with the center panel on top of the beadboard and get it evenly spaced at both ends with the grooves of the center panel. Now, mark the beadboard where it needs to be cut. Your reference marks should be about one thirty second of an inch (1/32″) shorter than the actual overall size of the board.
Rip the panels using a standard table saw set-up. Once all of the parts are cut to the proper sizes, sand all of the rough edges off.
Assembling The Framed Beadboard Kitchen Cabinet Doors
- Apply glue to the ends of the rails.
- Use a small brush to evenly apply the glue onto the tongue of the rail.
- Squirt glue inside the section of the stile where the rail will be attached.
- Fit the rail into the stile.
- Fit the panel into the grooves of both pieces, making sure that it is fully inserted.
- It may be necessary to use your rubber mallet to pursued the pieces to become fully seated.
- Repeat the process to install the rail at the other end of the bead board door frame.
- Check the door to see if it is square by measuring from corner to corner in both directions. If the measurements are the same, then this means that the kitchen cabinet door is square.
- Rack the framed pieces in the correct direction to true up the squareness of the frame if necessary.
- Glue the groove and tongue of the stile and rail and finalize the assembly. Use a mallet if necessary to secure the last place into proper position.
- Wipe off all excess glue with Wet Ones.
- Double check the assembled beadboard door for squareness.
- Clamp the panel together and leave it over night.
- Use the table saw to cut the oversize stiles to perfect length.
- Sand the doors with a vibrating sander.
- Paint or stain your kitchen cabinet doors to your desired color.
This is an excellent video instructional on how to make shaker style bead-board kitchen cabinet doors. I would recommend that you make a couple of practice doors first. This will help you figure out the exact formulas for cutting the right size pieces for the framed beadboard kitchen cupboard cabinet doors.
Remember, measure twice and cut once. Triple check all of your cut lists before making any cuts.